
Your domain name is often the first impression your online visitors have of your business. Securing the right domain is essential, but choosing the right domain registrar can be equally important. After thorough testing, we at Exemplifi have found that each registrar has its own advantages and disadvantages. In this article, we will guide you through on how to seamlessly transfer your domain from GoDaddy to to Namecheap.
Why Transfer a Domain from GoDaddy to Namecheap?

While GoDaddy is a popular choice for domain registration, many businesses find themselves not utilizing the full suite of services offered by GoDaddy, such as email services and website builders. In some cases, businesses use alternative solutions like G-Suite for collaboration and platforms like Webflow for website building, making these additional services from GoDaddy redundant.
Another significant factor to consider is pricing. While GoDaddy may offer attractive introductory prices, they tend to increase significantly in the following years, sometimes reaching over $70 per year. In contrast, Namecheap offers a competitive pricing structure, with domain registration costing only $35 per year. With cost-effectiveness and efficient utilization in mind, we made the decision to migrate our domain name to Namecheap. In the following sections, we will outline the simple steps to complete this transfer.
Why Transfer a Domain from GoDaddy to Namecheap?
To make the domain transfer process from GoDaddy to Namecheap smooth and hassle-free, we have broken it down into six clear steps, each accompanied by screenshots for your reference.
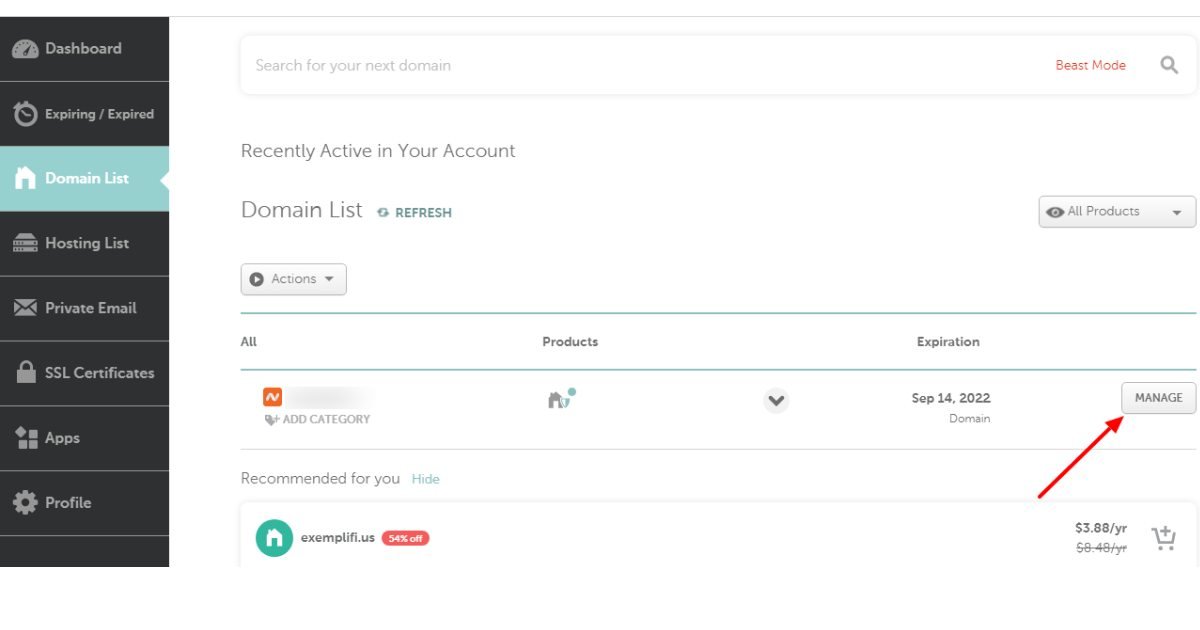
Step 1: Enable or Unlock Transfer in the Current Registrar (GoDaddy)
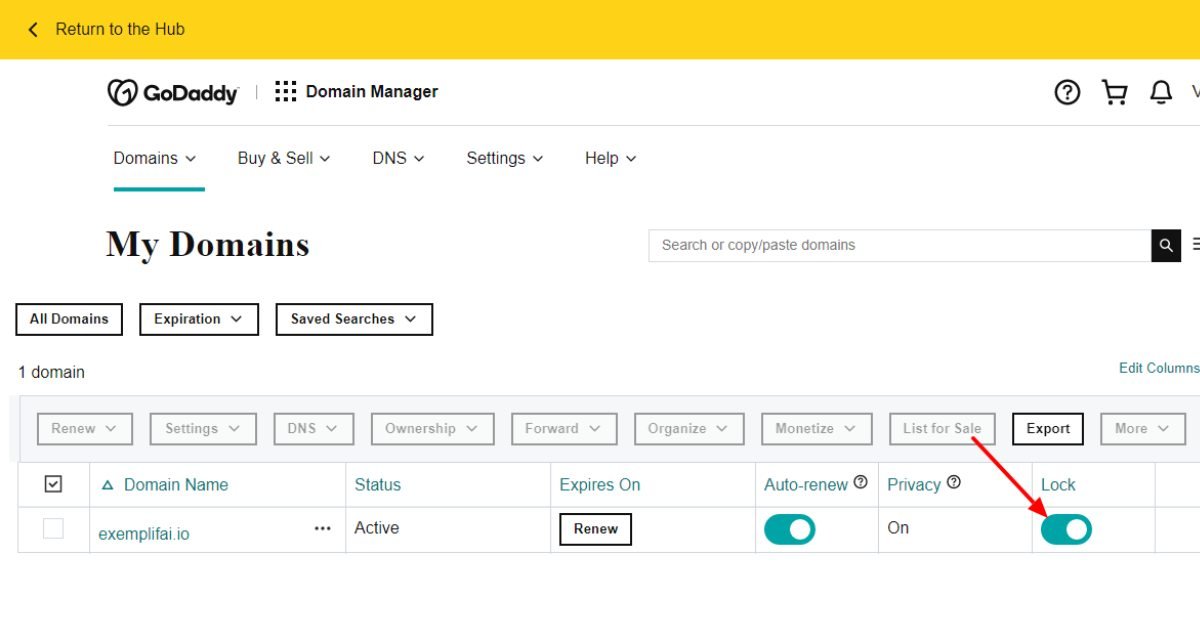
Unlocking your domain is the crucial first step in the transfer process. To do this, log in to your GoDaddy account, which should take you to the dashboard. From there, navigate to the “My Domains” section, where you’ll find a list of all your registered domains.
Locate the specific domain that you wish to transfer to Namecheap and select it. Within the domain management options, you should find an option to unlock the domain. This action allows the domain to be transferred to a different registrar.
It’s essential to note that domain locking is a security feature designed to prevent unauthorized transfers. Therefore, unlocking it is a necessary prerequisite for a successful transfer.
Step 2: Generate an Authentication Code (GoDaddy)
After unlocking your domain, you’ll need to generate an authentication code from GoDaddy. This code, also known as an EPP (Extensible Provisioning Protocol) or authorization code, is required by Namecheap to verify your ownership of the domain.
To generate this code, follow these steps:
-
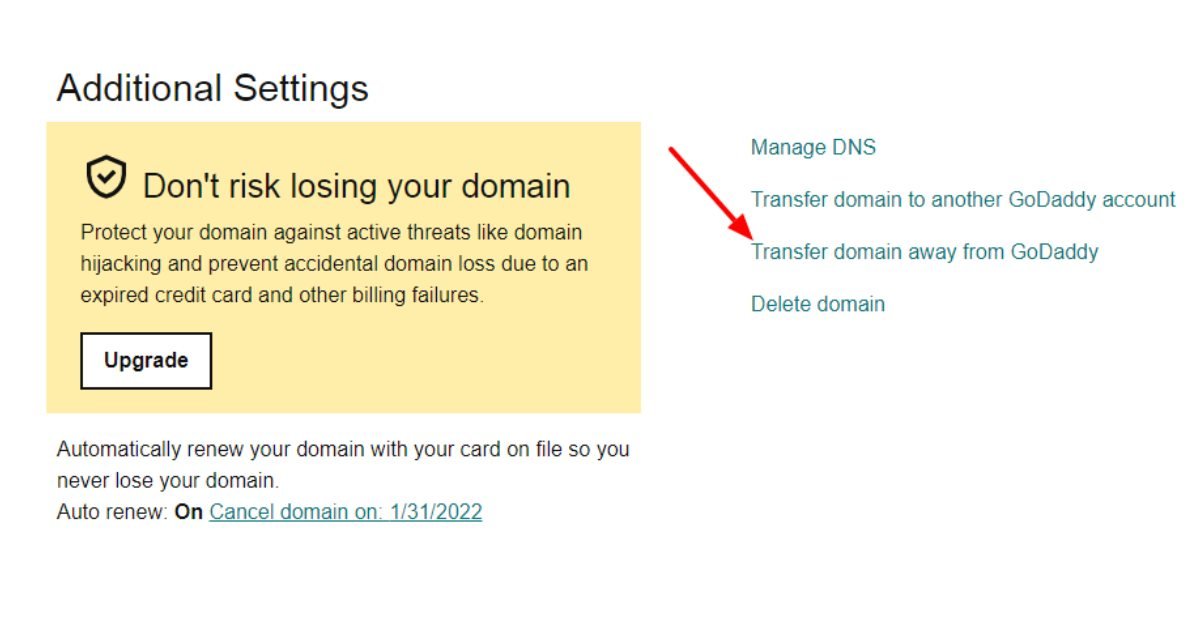
- In GoDaddy, select the specific domain you want to transfer.
- Look for the “Transfer domain away from GoDaddy” option, usually found within the domain management menu.
- Click on this option to initiate the transfer process.
- GoDaddy will provide a domain transfer checklist that you should review to ensure everything is in order before proceeding.
Once you’ve confirmed that everything is in order, continue with the transfer process. GoDaddy will then provide you with the authentication code you need for the transfer.
Step 3: Add Two Namecheap Name Servers (GoDaddy)
Adding Namecheap’s name servers to your GoDaddy settings is a strategic move to minimize website downtime during the transfer. It also ensures a smooth transition from one registrar to another. Here’s a more detailed breakdown of this step:
-
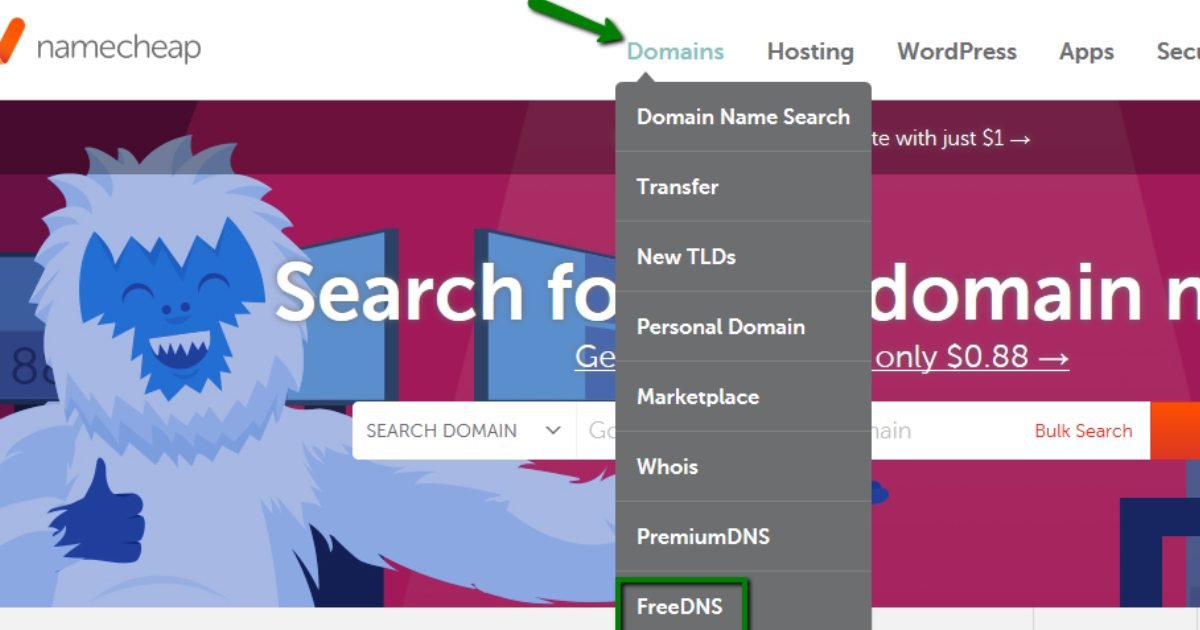
- Log in to your Namecheap account.
- Navigate to the “Domains” section and select “FreeDNS.”
- Within FreeDNS, add your domain and carefully follow the instructions provided.
Namecheap will then supply you with a set of free name server records. You should copy any two of these records, as they will be used in GoDaddy to maintain your website’s functionality during the transfer.
Now, return to your GoDaddy account and create two NS (Name Server) records in the DNS section. Input the name server information obtained from Namecheap. This step ensures that even during the transfer, your website continues to function seamlessly, without experiencing downtime.
Step 4: Add DNS Records in Namecheap
This step involves preserving your website’s DNS records, including A (Address), CNAME (Canonical Name), MX (Mail Exchange), and TXT (Text) records. By transferring these records to Namecheap, you ensure that your domain continues to operate smoothly after the transfer.
In GoDaddy, within the DNS section, make sure to copy or download all of your DNS records. These records are essentially instructions that dictate how web traffic should be handled for your domain, including pointing to your web server, handling email, and more.
Next, in your Namecheap account, access the domain list and select the specific domain you’re transferring. Click on “Manage” to access the domain’s settings. Then, navigate to “Advanced DNS” where you can add all your DNS records. This step effectively replicates your existing DNS settings in Namecheap.
By transferring your DNS records, you ensure that your website, email, and other domain-related services remain uninterrupted once the domain transfer is complete.
Step 5: Create a Transfer Request in Namecheap
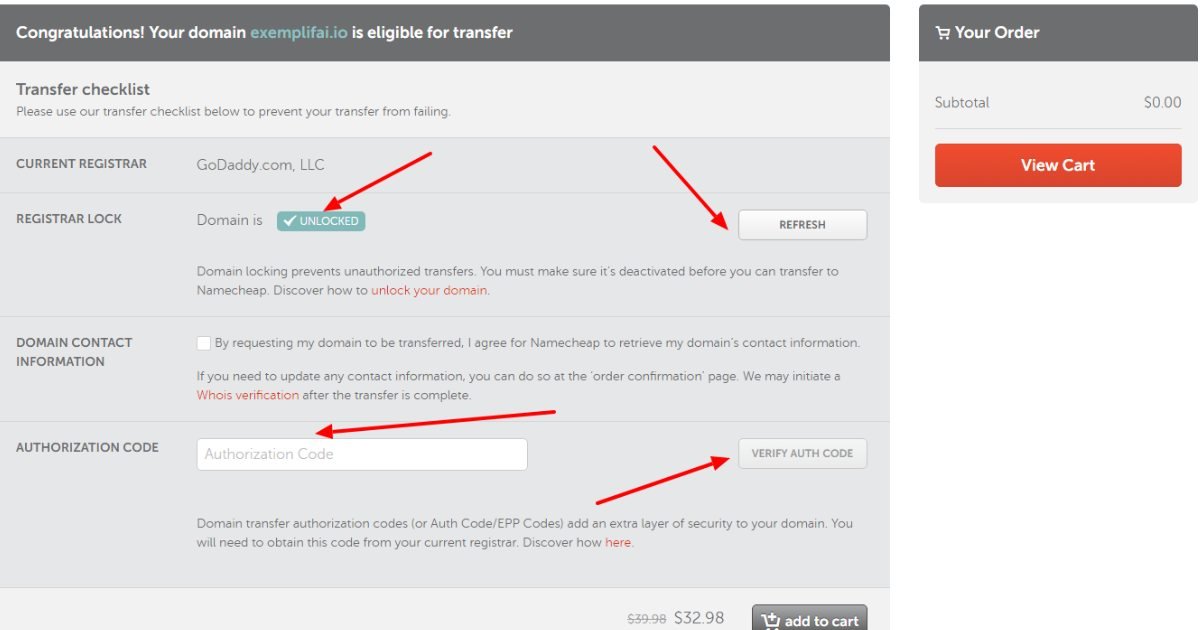
Creating a transfer request in Namecheap is the pivotal step in moving your domain from GoDaddy to Namecheap. During this phase, it’s crucial to verify two key aspects:
-
- Ensure the domain is properly unlocked: You’ve already unlocked your domain in GoDaddy during Step 1. However, double-check that it remains unlocked throughout the transfer process. This step is essential to avoid any hiccups.
- Input the correct authorization code: The authentication code you obtained from GoDaddy in Step 2 must be accurately entered during the Namecheap transfer request. This code serves as proof of ownership and authorization for the domain transfer.
Once you’ve successfully created the transfer request and verified these key aspects, Namecheap will take over the transfer process. They will communicate with GoDaddy and handle the technical aspects of the transfer.
Additional Step: Configure Standard Name Servers in Namecheap
Before finalizing the transfer, it’s essential to configure standard name servers in Namecheap. These name servers are crucial for your domain’s functionality once it’s fully transferred to Namecheap’s control.
This additional step ensures that your domain is seamlessly integrated into Namecheap’s infrastructure, allowing you to access their suite of services and manage your domain efficiently.
Ready to Streamline Your Online Presence with Namecheap?

Begin your hassle-free domain transfer from GoDaddy to Namecheap now. Experience a seamless transition, maintain your valuable online identity, and enjoy the benefits of cost-effective domain management. Make the switch to Namecheap today!
Final Thoughts
In summary, transferring your domain from GoDaddy to Namecheap is a straightforward process that saves costs and streamlines domain management. By following the six steps in this guide, you’ll ensure a seamless transition while maintaining your online presence.
Choosing the right registrar, such as Namecheap, is crucial for your specific needs, offering reliability and cost-effectiveness. Whether transferring one domain or many, these steps empower you to take control of your online identity and resources.
At Exemplifi, we prioritize informed decisions in domain registration and management. We hope this guide simplifies the transfer process, providing valuable insights. Remember, your domain is a vital asset for your online presence, and Namecheap is a trusted choice for safeguarding it.
FAQs
Why should I transfer my domain from GoDaddy to Namecheap?
Transferring your domain from GoDaddy to Namecheap can save you money in the long run. While GoDaddy may offer attractive introductory prices, they tend to increase significantly in subsequent years. Namecheap, on the other hand, provides cost-effective domain registration at a fixed annual rate. Additionally, if you’re not utilizing GoDaddy’s additional services like email and website building, Namecheap offers a more streamlined and cost-efficient solution.
Is the domain transfer process complicated?
No, the domain transfer process from GoDaddy to Namecheap is straightforward when you follow the outlined steps. It involves unlocking your domain, generating an authentication code, adding Namecheap’s name servers, replicating your DNS records, and creating a transfer request in Namecheap. Each step is well-documented and can be easily completed within your registrar accounts.
Will my website experience downtime during the transfer?
By adding Namecheap’s name servers in your GoDaddy settings (Step 3 of the process), you significantly reduce the risk of downtime. This step ensures that your website continues to function smoothly during the transfer. Additionally, transferring your DNS records (Step 4) helps maintain uninterrupted access to your website and email services.
How long does the domain transfer process take?
The duration of the domain transfer process can vary. Generally, it takes about 5 to 7 days for the entire transfer to be completed. However, the exact timeline may depend on factors such as your current registrar’s policies and the promptness of your responses during the process. Namecheap will keep you informed via email about the status of your transfer, so you can track its progress.